GRASS Location Wizard: Difference between revisions
(+see also) |
(minor update) |
||
| (23 intermediate revisions by 5 users not shown) | |||
| Line 1: | Line 1: | ||
== Creating a new location in GRASS == | == Creating a new location in GRASS == | ||
=== Graphical Location Wizard === | === [[wxGUI]] Graphical Location Wizard === | ||
The location wizard enables to create a new location in a few simple steps. | The location wizard enables to create a new location in a few simple steps. | ||
It provides a number of ways to set the map projection: from a geodata file (SHAPE, GeoTIFF etc), using an EPSG code, setting parameters manually, etc. | It provides a number of ways to set the map projection: from a geodata file (SHAPE, GeoTIFF etc), using an EPSG code, setting parameters manually, etc. | ||
Here an example | Here an example of manual definition of a spatial reference system (SRS), GRASS internally speaks to PROJ4 in its own language to set up the SRS. | ||
First screen of the Location wizard which is found in the GRASS GIS Startup window: | First screen of the Location wizard which is found in the GRASS GIS Startup window: | ||
[[Image: | [[Image:Location_wizard_select_Planetary_Ellipsoid_Page.png|500px|thumb|center|GRASS Location Wizard: user choices]] | ||
The location wizard also helps you select the appropriate geodetic | The location wizard also helps you select the appropriate geodetic | ||
datum and transform parameters for your map projection.: | datum and transform parameters for your map projection.: | ||
[[Image: | [[Image:Location_wizard_select_Projection.png|500px|thumb|center|GRASS Location Wizard: choosing the projection]] | ||
[[Image: | [[Image:Location_Wizard_Geodatum.png|500px|thumb|center|GRASS Location Wizard: choosing the geodetic datum]] | ||
[[Image: | [[Image:Location_Wizard_geodatum1.png|500px|thumb|center|GRASS Location Wizard: finishing the creation of the new location]] | ||
After the location is created successfully, the GRASS GIS session is started. If you generated the new location from a geocoded raster (e.g., GeoTIFF) or vector file (e.g. SHAPE), you are asked if you want to '''import the map'''. Doing so, the default region extent is set automatically and the map is imported. | After the location is created successfully, the GRASS GIS session is started. If you generated the new location from a geocoded raster (e.g., GeoTIFF) or vector file (e.g. SHAPE), you are asked if you want to '''import the map'''. Doing so, the default region extent is set automatically and the map is imported. | ||
| Line 51: | Line 51: | ||
The usage is similar to that of raster data (see above). | The usage is similar to that of raster data (see above). | ||
== Text based location wizard == | == GRASS GIS 6: Text based location wizard == | ||
When starting GRASS GIS in text mode, you can also create a new location within the terminal console. | When starting GRASS GIS 6 in text mode, you can also create a new location within the terminal console. | ||
<pre> | <pre> | ||
| Line 137: | Line 137: | ||
Now the project area, i.e. the location including a mapset, has been created. You have "arrived" in the GRASS GIS system and can start working within this new location. | Now the project area, i.e. the location including a mapset, has been created. You have "arrived" in the GRASS GIS system and can start working within this new location. | ||
== GRASS GIS: Creating locations from command line == | |||
You can create a new '''location''' from a raster or vector file or EPSG code: | |||
<source lang="bash"> | |||
# create new location from raster map (file must contain projection metadata): | |||
grass -c myraster.tif /home/user/grassdata/mynewlocation | |||
# create new location from vector map (file must contain projection metadata): | |||
grass -c myvector.shp /home/user/grassdata/mynewlocation | |||
# create new location from EPSG code: | |||
grass -c EPSG:31370 /home/user/grassdata/mynewlocation | |||
</source> | |||
You can use the -c flag to create a new '''mapset''' within an existing location: | |||
<source lang="bash"> | |||
# create new mapset in an existing location: | |||
grass -c /home/user/grassdata/nc_spm_08_grass7/mynewmapset | |||
</source> | |||
== Planetary mapping == | |||
=== ISIS-GRASS === | |||
When Isis (astrogeology.usgs.gov) is installed, GRASS recognizes it and opens the ISIS-GRASS planetary mode. Isis commands and GRASS commands are both recognized at the same time, permitting combined scripting. Possibilities of building an Isis menu into GRASS is found in the [[Planetary_mapping]] page in this wiki. | |||
[[Image:Isisgrasswelcome.png|500px|thumb|center|ISIS-GRASS welcome page]] | |||
=== Planetary IAU codes === | |||
by selecting the "New" button under "2. Select GRASS Location", the user will be able to select one of these options, including IAU planetary codes (default is 2009, you can browse for the input file IAU2000.csv). | |||
[[Image:Location_wizard_with_IAU_codes.png|500px|thumb|center|GRASS Location Wizard: user choices]] | |||
Once this is done, the user finds this selection page of IAU codes. | |||
[[Image:Location_wizard_select_IAU_Projection.png|500px|thumb|center|GRASS Location Wizard: IAU page user choices]] | |||
=== Planetary ellipsoid tables === | |||
GRASS 7 and its wxGUI location wizard have ellipsoid tables and support for the planetary bodies (hence, planets other than Earth) in our solar system. | |||
by selecting the "New" button under "2. Select GRASS Location", the user will be able to select one of these options. Select the following: | |||
[[Image:Location_wizard_select_Planetary_Ellipsoid_Page.png|500px|thumb|center|GRASS Location Wizard: user choices]] | |||
Once this is done, the user finds this selection page to define the projection system. | |||
[[Image:Location_wizard_select_Planetary_Ellipsoid_Page1.png|500px|thumb|center|GRASS Location Wizard: Projection page user choices]] | |||
At this point, you need to select the Ellipsoid (only) button. | |||
[[Image:Location_wizard_select_Planetary_Ellipsoid_Page2.png|500px|thumb|center|GRASS Location Wizard: Ellipsoid page user choices]] | |||
Finally, the planetary bodies option will appear. | |||
[[Image:Location_wizard_select_Planetary_Ellipsoid_Page3.png|500px|thumb|center|GRASS Location Wizard: Choose planetary bodies definitions]] | |||
== Galactic mapping == | |||
=== Milky Way and Galaxy coordinate systems === | |||
Depending on your reference frame, simple XY and lat/lon+spheroid locations can set up arbitrary Cartesian or polar coordinate systems as you like. | |||
== See also == | == See also == | ||
* EPSG | * EPSG.io: http://epsg.io/ | ||
* EPSG | * EPSG Geodetic Parameter Dataset (Official database of EPSG codes): http://www.epsg-registry.org/ | ||
* Spatial Reference (Database of official and unofficial EPSG codes): http://spatialreference.org/ | |||
* How geodetic [http://fwarmerdam.blogspot.it/2010/03/in-last-few-weeks-i-believe-i-have-made.html datum selection works in GDAL/OGR and PROJ4] | * How geodetic [http://fwarmerdam.blogspot.it/2010/03/in-last-few-weeks-i-believe-i-have-made.html datum selection works in GDAL/OGR and PROJ4] | ||
[[Category: Documentation]] | [[Category: Documentation]] | ||
[[Category: FAQ]] | [[Category: FAQ]] | ||
[[Category: | [[Category: Import]] | ||
{{wxGUI}} | |||
Latest revision as of 07:22, 10 October 2023
Creating a new location in GRASS
wxGUI Graphical Location Wizard
The location wizard enables to create a new location in a few simple steps. It provides a number of ways to set the map projection: from a geodata file (SHAPE, GeoTIFF etc), using an EPSG code, setting parameters manually, etc.
Here an example of manual definition of a spatial reference system (SRS), GRASS internally speaks to PROJ4 in its own language to set up the SRS.
First screen of the Location wizard which is found in the GRASS GIS Startup window:
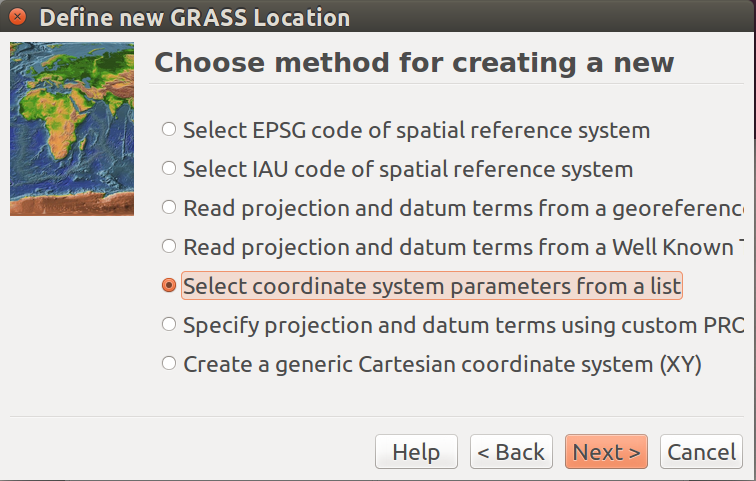
The location wizard also helps you select the appropriate geodetic datum and transform parameters for your map projection.:
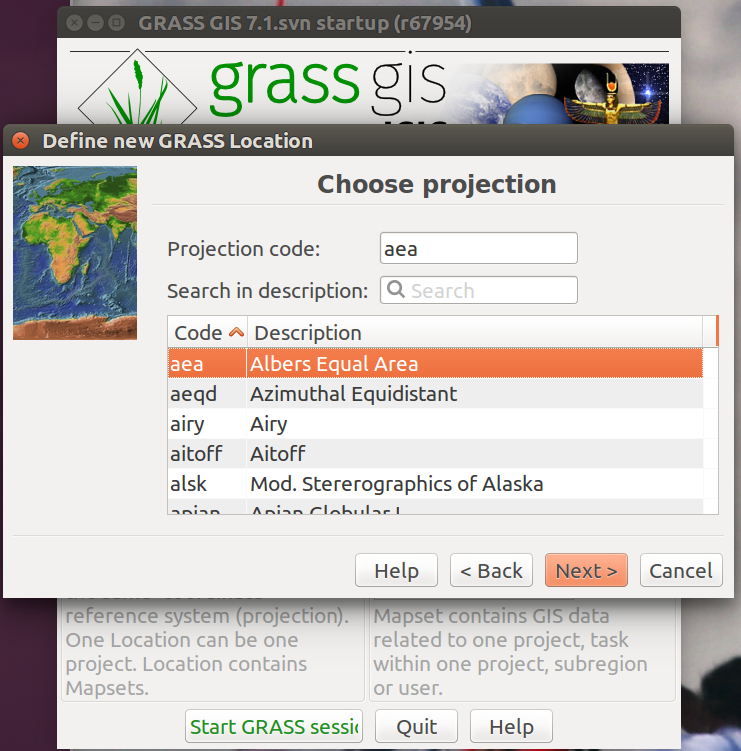
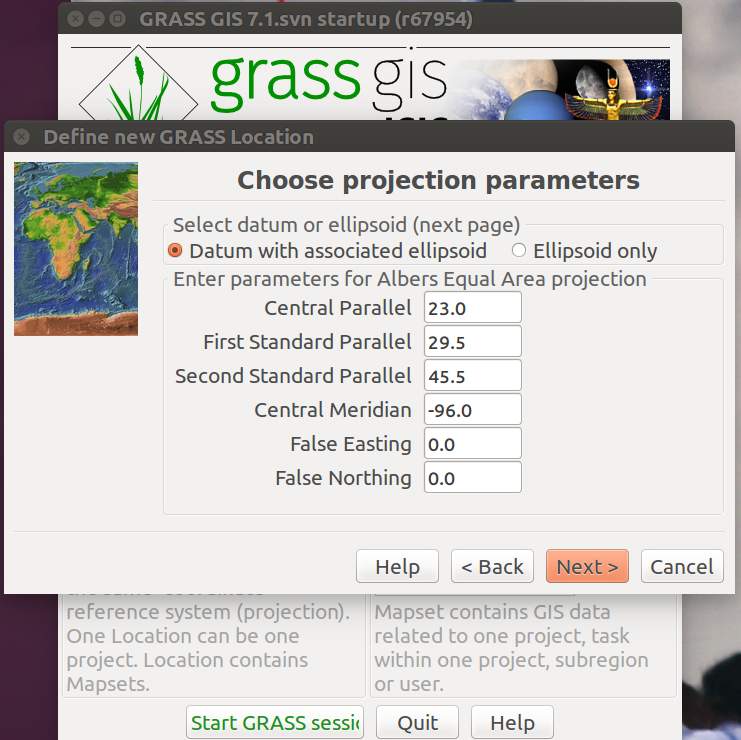
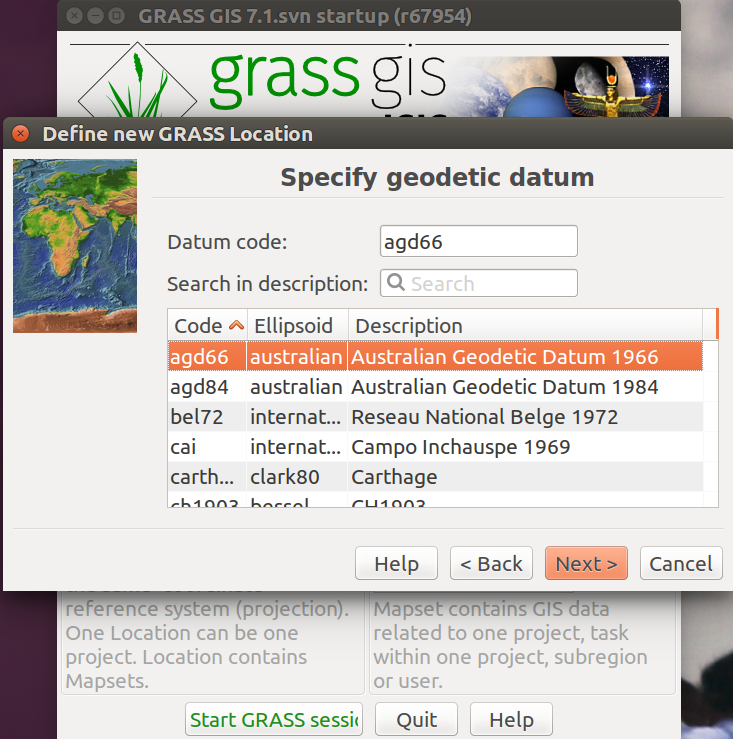
After the location is created successfully, the GRASS GIS session is started. If you generated the new location from a geocoded raster (e.g., GeoTIFF) or vector file (e.g. SHAPE), you are asked if you want to import the map. Doing so, the default region extent is set automatically and the map is imported.
Import raster data
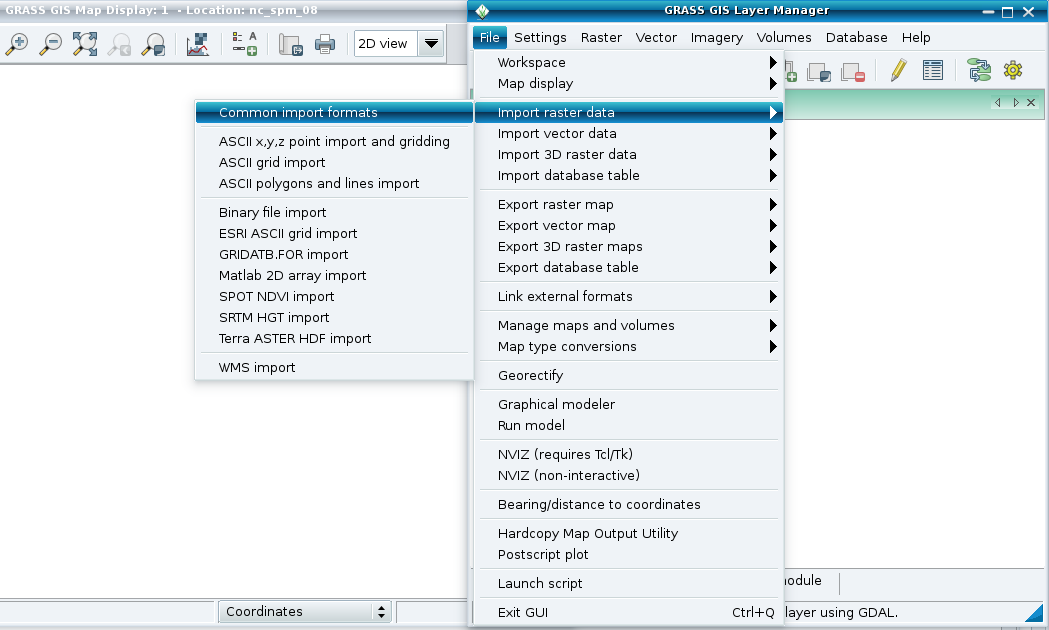
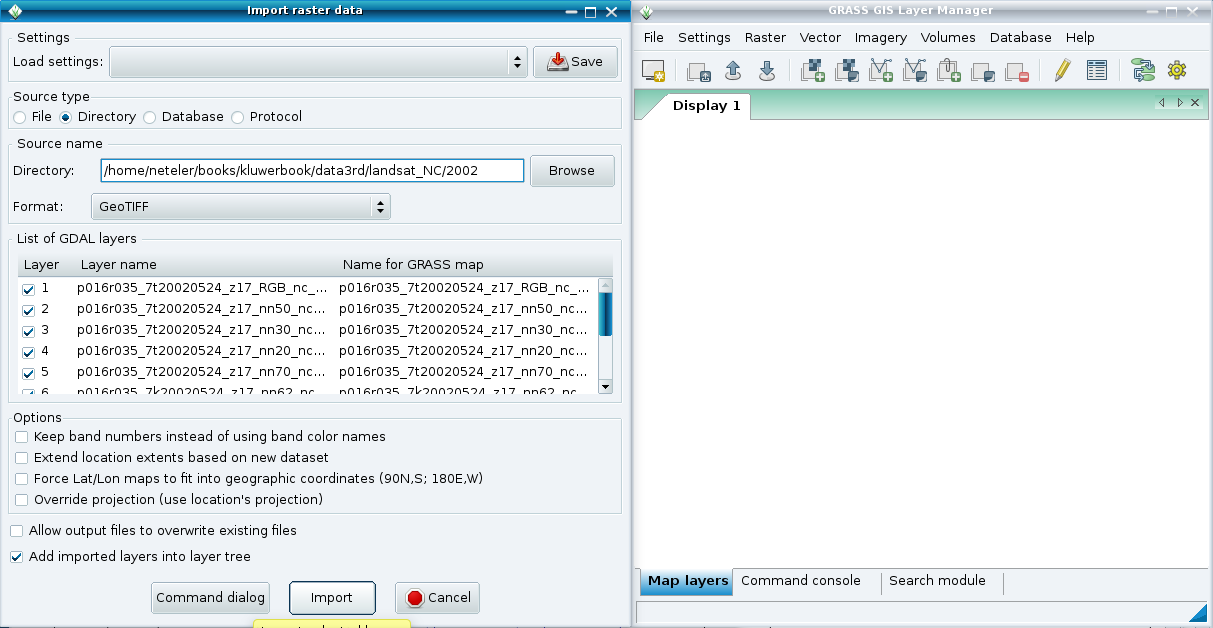
From the main GRASS GIS menu, go to "File" --> "Import raster data" for easy raster map import.
For example, to import multiple GeoTIFF files, run:
 |
 |
Import vector data
From the main GRASS GIS menu, go to "File" --> "Import vector data" for easy vector map import.
 |
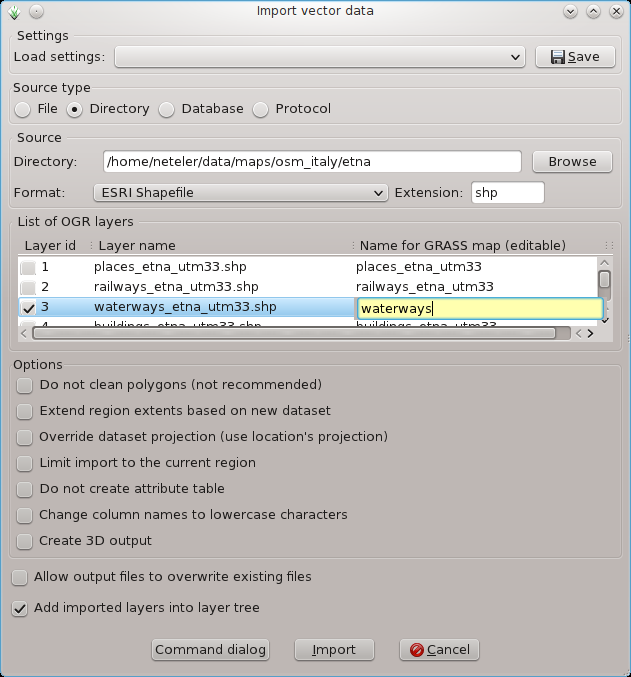 |
The usage is similar to that of raster data (see above).
GRASS GIS 6: Text based location wizard
When starting GRASS GIS 6 in text mode, you can also create a new location within the terminal console.
                            GRASS 6.4.3

DATABASE: A directory (folder) on disk to contain all GRASS maps and data.

LOCATION: This is the name of a geographic location. It is defined by a
          co-ordinate system and a rectangular boundary.

MAPSET:   Each GRASS session runs under a particular MAPSET. This consists of
          a rectangular REGION and a set of maps. Every LOCATION contains at
          least a MAPSET called PERMANENT, which is readable by all sessions.

         The REGION defaults to the entire area of the chosen LOCATION.
         You may change it later with the command: g.region
- - - - - - - - - - - - - - - - - - - - - - - - - - - - - - - - - - - -

LOCATION:   newLocation______________  (enter list for a list of locations)
MAPSET:     PERMANENT________________  (or mapsets within a location)

DATABASE: /home/user/grassdata______________________________________________

           AFTER COMPLETING ALL ANSWERS, HIT <ESC><ENTER> TO CONTINUE
                            (OR <Ctrl-C> TO CANCEL)
In the startup text screen enter a new location name, and then continue by pressing "ESC"-"RETURN" - i.e. press (NOT hold) the ESC key, and then press the RETURN key on your keyboard.
The you will be asked "Would you like to create location <newLocation> ? (y/n) [y]": confirm with the RETURN key on your keyboard. Now you reach:
To create a new LOCATION, you will need the following information:

1. The coordinate system for the database
        x,y (for imagery and other unreferenced data)
        Latitude-Longitude
        UTM
        Other Projection
2. The zone for the UTM database
   and all the necessary parameters for projections other than
   Latitude-Longitude, x,y, and UTM
3. The coordinates of the area to become the default region
   and the grid resolution of this region
4. A short, one-line description or title for the location

Do you have all this information? (y/n) [y]
Confirm with the RETURN key on your keyboard.
Please specify the coordinate system for location <dewLocation>

A   x,y
B   Latitude-Longitude
C   UTM
D   Other Projection
RETURN to cancel

>
Next you will need to assign parameters to the location such as the coordinate system and datum you want to use, the project area's boundary coordinates, and the default resolution for raster data:
- Start by chosing between, X,Y, Latitude-Longitude, UTM, or "other" coordinate system. This choice depends on your data and the use you will make of it;
- You are then prompted for a single line of text describing the project area, for example "Topo Map of the Alps".
Next you are requested for some more information about the projection. Note that the prompts vary from projection to projection, an example follows:
- (if you chose "D - Other Projection") "specify projection name": "list" gives you the list of all available projections, examples are "tmerc" for Transverse Mercator, "lcc" for Lambert Conformal Conic, "moll" for Mollweide, etc.;
- specify datum name: again use "list" to get a list of available datums, examples are "wgs84", "nad27", "eur79", etc.;
- Enter Central Parallel: 0 if you want the Equator as the central parallel;
- Enter Central Meridian: 0 if you want the Greenwich meridian as central meridian;
- Enter Scale Factor at the Central Meridian;
- Enter plural form of map units: for example, meters .
The next step is the description of the project area's boundary coordinates and the definition of the default raster resolution:
The default raster resolution (GRID RESOLUTION) has to be chosen according to your needs. Generally, it is advisable to work in steps of 0.25 (0.25, 0.5, 1.75, 2.00, 12.25 etc.). This resolution does not concern vector and site data since these are stored with their exact coordinate values. Note that every raster map may have its own resolution. You can leave this screen with "ESC"-"RETURN" and then if everything is correct accept the list of parameters that appears.
You will then be back to the startup screen to enter the mapset's name (if not already entered). Another "ESC"-"RETURN" will finally let you leave this screen. This mapset is created within the new location by answering "yes" to the next question. The mapset will use the parameters of the location (such as the region and resolution definitions) as its default parameters.
Now the project area, i.e. the location including a mapset, has been created. You have "arrived" in the GRASS GIS system and can start working within this new location.
GRASS GIS: Creating locations from command line
You can create a new location from a raster or vector file or EPSG code:
# create new location from raster map (file must contain projection metadata):
grass -c myraster.tif /home/user/grassdata/mynewlocation

# create new location from vector map (file must contain projection metadata):
grass -c myvector.shp /home/user/grassdata/mynewlocation

# create new location from EPSG code:
grass -c EPSG:31370 /home/user/grassdata/mynewlocation
You can use the -c flag to create a new mapset within an existing location:
# create new mapset in an existing location:
grass -c /home/user/grassdata/nc_spm_08_grass7/mynewmapset
Planetary mapping
ISIS-GRASS
When Isis (astrogeology.usgs.gov) is installed, GRASS recognizes it and opens the ISIS-GRASS planetary mode. Isis commands and GRASS commands are both recognized at the same time, permitting combined scripting. Possibilities of building an Isis menu into GRASS is found in the Planetary_mapping page in this wiki.
Planetary IAU codes
by selecting the "New" button under "2. Select GRASS Location", the user will be able to select one of these options, including IAU planetary codes (default is 2009, you can browse for the input file IAU2000.csv).
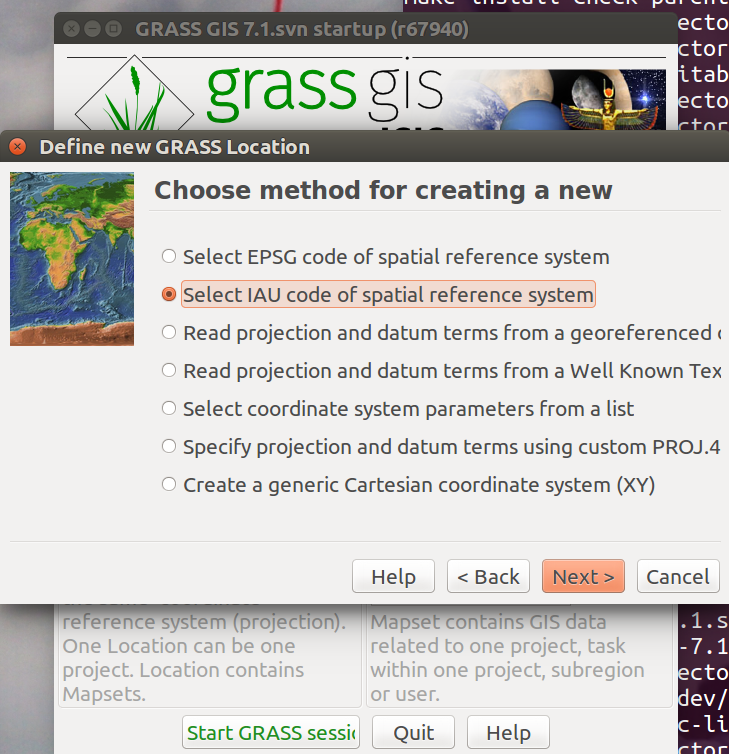
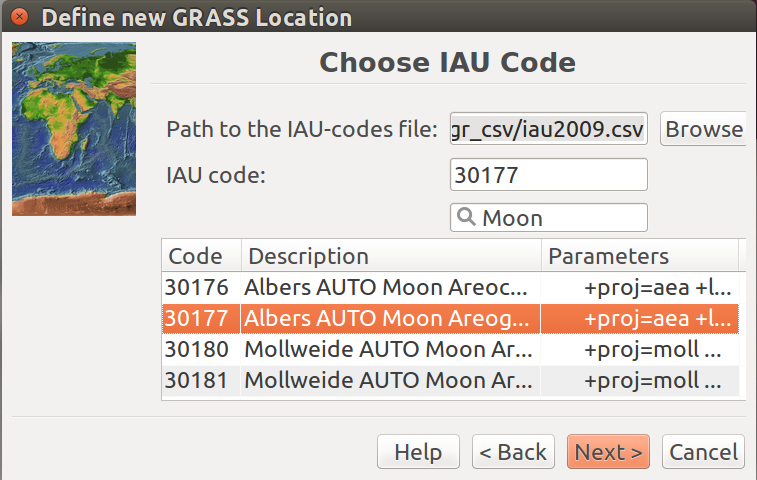
Once this is done, the user finds this selection page of IAU codes.
Planetary ellipsoid tables
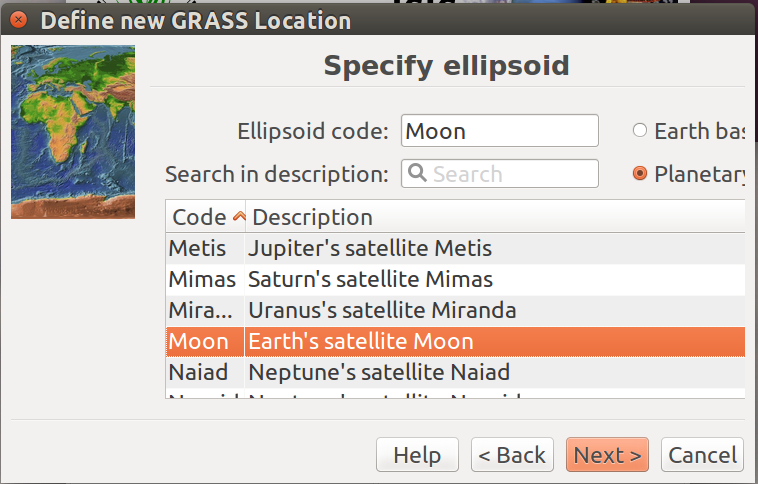
GRASS 7 and its wxGUI location wizard have ellipsoid tables and support for the planetary bodies (hence, planets other than Earth) in our solar system.
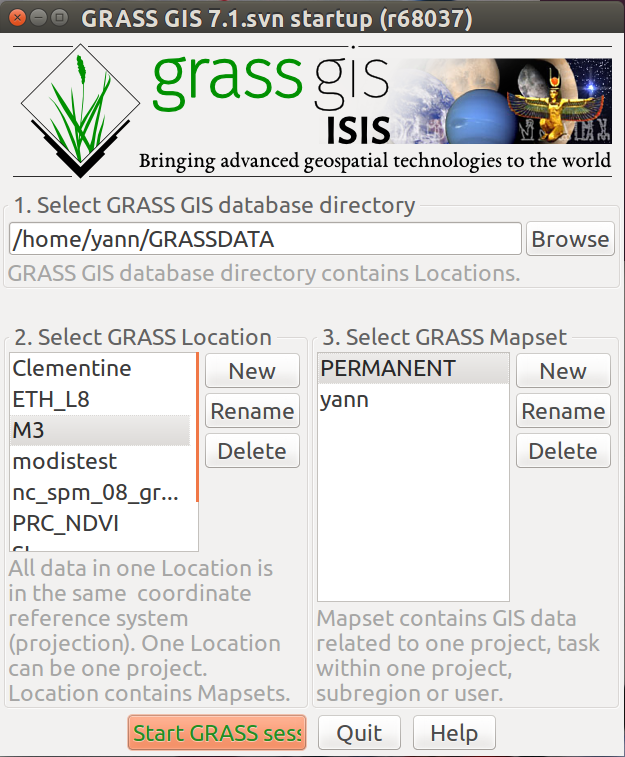
by selecting the "New" button under "2. Select GRASS Location", the user will be able to select one of these options. Select the following:

Once this is done, the user finds this selection page to define the projection system.
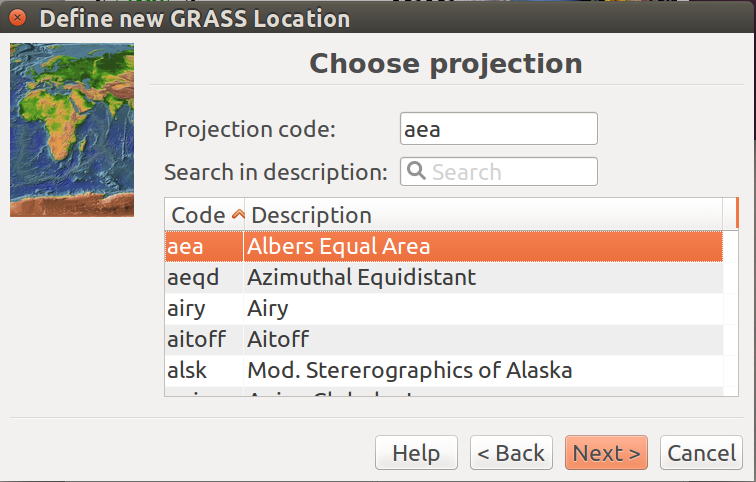
At this point, you need to select the Ellipsoid (only) button.
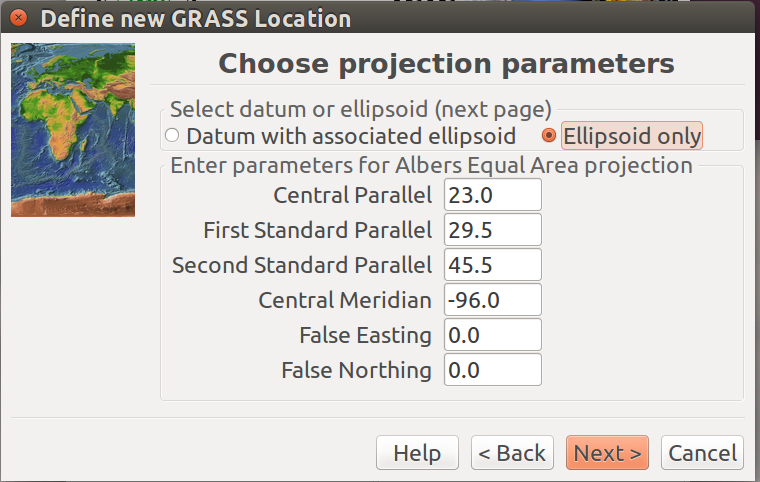
Finally, the planetary bodies option will appear.
Galactic mapping
Milky Way and Galaxy coordinate systems
Depending on your reference frame, simple XY and lat/lon+spheroid locations can set up arbitrary Cartesian or polar coordinate systems as you like.
See also
- EPSG.io: http://epsg.io/
- EPSG Geodetic Parameter Dataset (Official database of EPSG codes): http://www.epsg-registry.org/
- Spatial Reference (Database of official and unofficial EPSG codes): http://spatialreference.org/
- How geodetic datum selection works in GDAL/OGR and PROJ4