GRASS and Sextante
GRASS has been integrated into Sextante as extension. Sextante itself is commonly used within gvSIG. Through this integration, gvSIG users have access to the wealth of well tested algorithms provided by GRASS.
As of today the easiest and best alternative to use GRASS in SEXTANTE is within gvSIG Community Edition (CE). gvSIG CE is a community driven Open Source GIS project based on gvSIG OADE bundled with SEXTANTE. Both teams (SEXTANTE and gvSIG CE) have decided to unite forces and will be, from now on, sharing their development policies and strategies (http://sextantegis.blogspot.com/2011/12/important-notice-for-gvsig-users.html). Developers of gvSIG OADE and SEXTANTE are working together in gvSIG CE.
gvSIG CE includes SEXTANTE, neither installation of SEXTANTE nor configuration to use GRASS is needed. A technical preview of the upcoming gvSIG Community Edition 1.0 is available for download here. It includes a SEXTANTE snapshot from 08/28/2011. This is a zero-install distribution. Simply unpack it somewhere on your harddisk and start it.
The information described below will help you if you would like to use GRASS in gvSIG OADE or in gvSIG 1.10.
Note: the GDAL-GRASS plugin must be installed.
Installation
Both gvSIG and QGIS support Sextante which itself offers a smooth GRASS GIS integration.
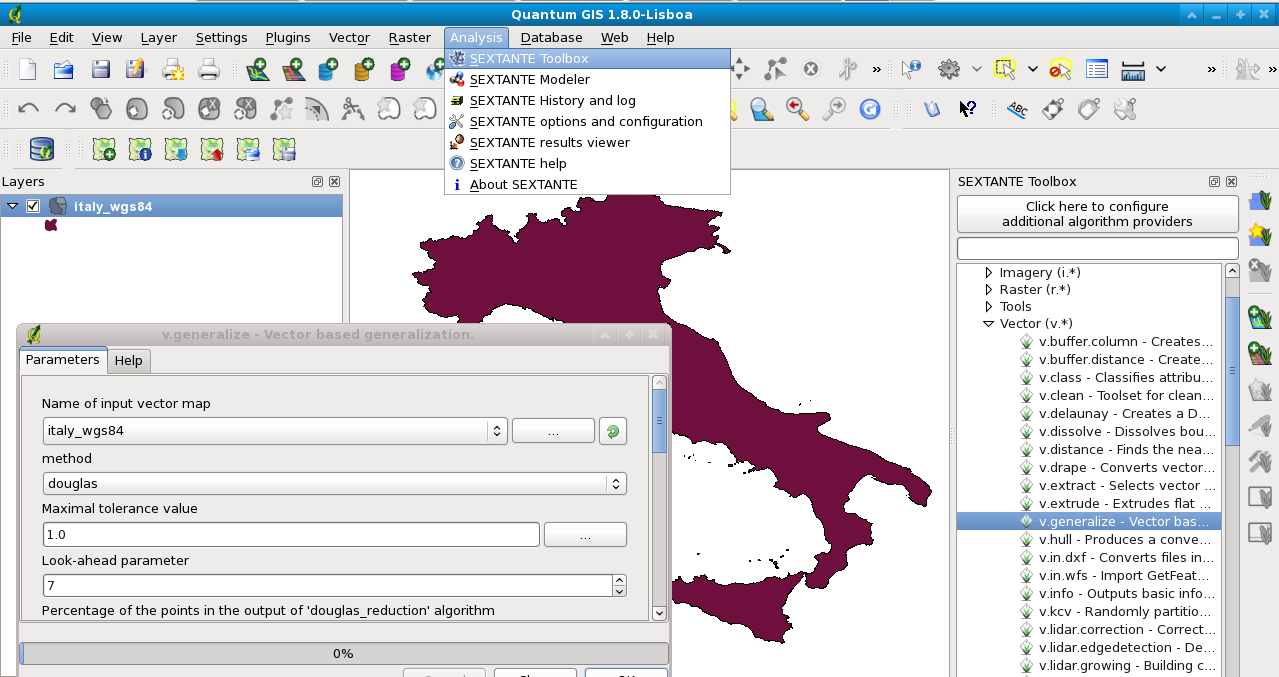
In QGIS: Sextante plugin with GRASS GIS support
Since 2012, a new Sextante plugin for QGIS is available. Just get it through the QGIS plugin manager (Fetch plugins --> Sextante). This way of using GRASS in QGIS is superior to the QGIS-GRASS toolbox, unless your data is already in a GRASS database, since the creation and management of the GRASS location is handled automatically by Sextante. This leads to a seamless integration, using GRASS GIS as powerful backend to QGIS.

In gvSIG: How to install the improved gvSIG OADE version
From version gvSIG OA Digital Edition 2010 (1.0) onwards, Sextante 0.6 with integrated GRASS GIS support is included.
You can download and install OADE gvSIG binaries from here.
Note 1: If you are on a 64bit system, add this to your settings file, e.g. $HOME/.bashrc:
 # 32bit fix
 export LD_LIBRARY_PATH=$HOME/gvsig-oade-2010-1.0.0/grass/lib/
Note 2: If you want to use latest GRASS 6.4 rather than the bundled version, you have two options:
- you can install or use an already installed version by pointing to the right path in the Sextante setup (see below);
- you can replace the included grass/ version in the gvsig-oade-2010-1.0.0/ directory. For example, get latest Linux 32bit GRASS binaries here. Likewise, for MacOSX (or Windows).
In gvSIG: Alternative: How to install the original gvSIG version
From gvSIG 1.10 onwards, Sextante with integrated GRASS GIS support is included (which yet fails):
- download gvSIG binaries from here (download the All-included version)
- run the installer
- start gvSIG
Activating GRASS GIS in Sextante
(modified after grass_sextante.html)
Configuring Sextante to use GRASS takes just a few easy steps. Once you have configured the system, you will be able to execute GRASS algorithms from any Sextante component like the toolbox or the graphical modeller, just like you do with any other Sextante geo-algorithm.
Only two parameters must be set, namely:
- The path to the GRASS installation folder. It is needed by Sextante to execute GRASS commands.
- The path to a GRASS mapset. Sextante is able to use a temporary mapset.
So we do the simple setup:
- Open the Sextante Toolbox icon
- Go to Sextante settings (open icon -> right of the "Search" bar at bottom of the window)
- Go to "GRASS". Set therein
- GRASS folder: /path/to/grass-binary-installation/ (e.g., /usr/local/grass-6.4.0/ )
- Activate "Create temporary mapset"
- Click on "Setup GRASS" to register the raster and vector commands
- Now click on the "Help" button to know that it is there and what it contains
- Finally click "OK" to leave the dialog. Now 5xx Sextante/GRASS commands should be available
How to use
Note that GRASS is used in an internal temporary session (so you cannot open GRASS data but work on GeoTIFF, SHAPE files using GRASS through gvSIG/Sextante).
Getting sample data
A sample dataset (based on free North Carolina dataset, packaged by B. Ducke) is coming with the gvSIG-OADE installer. Otherwise, if you prefer, you can also download and unpack it manually from here.
This data set contains several raster and vector map files. The projection is (EPSG code 32119).
Sample session
- Start a new project: "File" -> "New Project" -> Click on the new name -> "Open" button
- Set the projection of the View: "View" -> "Properties" -> "Current projection" -> "Type:" select "EPSG" -> Enter code: "32119" -> Click on "Search" -> Click on "OK" -> Accept Properties with "OK"
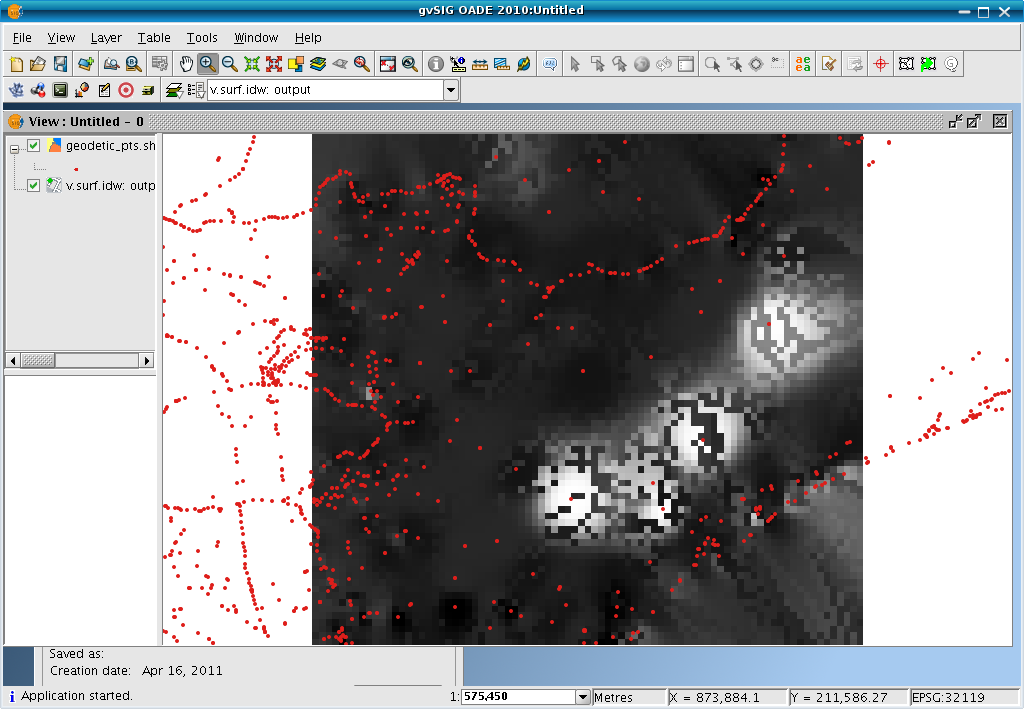
Vector points map interpolation
- Add a vector points map with the "Add layer" icon (top menu): File -> "Add" -> Select file "geodetic_pts.shp" -> "OK"
- Zoom to a portion of the map
- Open Sextante dialog
- Go to "GRASS", expand "Vector (v.*)"
- Select "v.surf.idw" (double click)
- The SHAPE file "geodetic_pts.shp" should be preselected. Enter as column name "elevation".
- Go to the region tab and select "Use extent from view".
- Enter "Cell size": 1000 (this is in map units, here: meters)
- Click "OK" to run the computation
- The resulting IDW interpolated raster map should appear in the view.

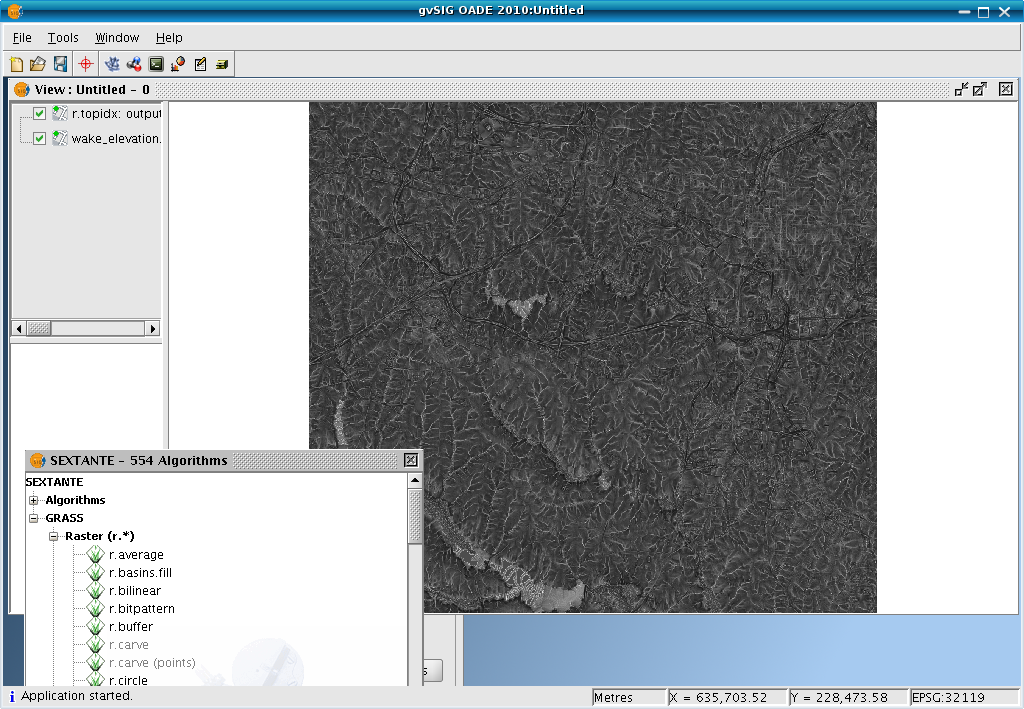
Raster map analysis: Create topographic index map from elevation map
- Add a raster elevation map with the "Add layer" icon (top menu): File -> "Add" -> Select File Type "Raster" -> Select file "north_carolina/wake/wake_elevation.tif" -> "OK", "Accept" projection.
- "Zoom to layer" with right mouse button in the legend
- Open Sextante dialog
- Go to "GRASS", expand "Raster (r.*)"
- Go to "r.topidx"
- Start (double click) r.topidx, the map "wake_elevation.tif" should be predefined, as output write "wake_topidx.tif" (it will go into your current directory; check with browse button),
- Go to the region tab and select "Use extent from view".
- Enter "Cell size": 10 (this is in map units, here: meters)
- Click "OK" to run the computation
- It should have generated a new map which should appear in the view.

See also
Software:
- http://code.google.com/p/sextante/
- HOWTO adding own GRASS algorithms to Sextante (simply by adding a new description file):
References:
- Victor Olaya's blog announcement of the integration
- V. Olaya, JC Giménez, 2010: Integrating Sextante and GRASS. FOSS4G 2010, Barcelona
- M. Neteler, 2011: GRASS GIS e Sextante. Quarte Giornate Italiane di gvSIG, 19-21 Apr 2011, Udine, Italy (PDF)
- R.Schönbuchner, 2011: Sextante-eine freie Java-Bibliothek zur Geodatenanalyse